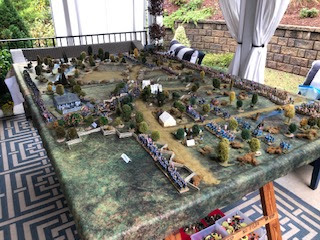
I've been running an ACW campaign based on Hood's historical Franklin to Nashville Campaign of 1864. We have multiple players from the USA, UK, Australia and Germany all playing. The campaign has been run through Facebook with a dedicated FB page and using FB Messenger to ask for orders and relay information.One of biggest challenge has been the time zones where my phone has been buzzing 24/7! Its been great fun and I'd like to thank all of the players for making this a very fun and memorable campaign! I've enjoyed running the campaign and I hope they have enjoyed playing in it!
The majority of both armies now sit outside Nashville and what will most certainly be the climatic battle of the campaign will occur. We have fought several key battles during the campaign and all have been fought out by groups in Australia (thank you Norsemen!), the USA (thanks Norris!) and the UK (thank you Lenton Gamers!). Each group has fought out the battles using their favorite rules (Fire and Fury / Johnny Reb / Longstreet) and the results of the battle applied to the brigades, divisions and corps.
Here is a brief history of the campaign:
Order of battle:
USA - Gen Thomas
IV Corps - Gen Wood 15,500 men
XXII Corps - Gen Schofield 10,000 men
XVI Detachment of the AoT - Gen. Smith = 10,000 men
Provisional Detachment - Gen Steedman - 6,400 men
Cavalry Corps - Gen Wilson - 12,000 men (7,000 mounted).
(The Union army faced a shortage of horses and the army included many green troops)
CSA - Gen Hood
Gen Lee's Corps - 8,600 men
Stewart's Corps - 8,700 men
Cheatham's Corps - 10,000 men
Gen Forrest's Cavalry Corps - 5,000 men
(The Rebels were short on supplies but and elite, motivated force).
Opening positions -
USA - Schofield in Pulaski, TN (isolated)
Wood, Smith and Provisonla Corps in and around Nashville
Willson - Nashville and in scouting positions near Columbia,TN and Duck River line.
CSA - concentrated around Athens, AL.
High level movements and Key Events:
Nov 21 - Skirmish outside Pulaski. (Rebel cavalry scouting / feinting towards town). The Rebel army begins marching toward Fayetteville and Winchester. One of Forrest's divisions is sent into north Georgia to assist the fish against Sherman's supply lines.
Nov 22 - Schofield falls back to Columbia and then Franklin to reunite with the army.
Nov 24 - The Federal line runs West to East from Spring Hill to Chapel Hill and Bell Buckle (facing south). The Rebel army is in Tullahoma moving NE. Wilson's cavalry is counting from Pulaski to Lewisburg and Shelbyville. Cheatham is still in northern Alabama.
Nov 25 - Snow. Stewart's corp moves toward Pulaski. Forrest and Lee are in Tullahoma and Cheatham is in AL.
Nov 26 - Lee's corp marches to McMinnville, Stewart is in Pulaski and Cheatham moving into TN from Anderson, AL. The Rebel army is spread out and vulnerable. The Federal infantry is still in position along the Spring Hill to Bell Buckle line, with Wilson scouting to the south.
Nov 27 - Stewart moves to Fayetteville, Cheatham marching to Winchester and Lee is in Manchester.
Nov 28 - Stewart and Cheatham concentrated in Winchester. Lee in McMinnville. Forrest continues scouting for the army and pushing back Wilson's troopers. Lee's men are in a position to flank the Federal army. Gen Thomas and the dismounted cavalry corps are in Murfreesboro. Steedman is still in Nashville.
Dec 1 - The Battle of Murfreesboro - Stewart's and Lee's corp attacked across Stone's River and assaulted Smith and Wood's corps. Schofield is in Franklin, TN. The Rebels are repulsed with losses.
Dec 3 - The Assault on Fortress Rosecrans - The Rebel army assaulted Fortress Rosecrans and was repulsed with heavy losses. The Federal line runs loosely from Murfreesboro to Nashville and is now aligned NW to SE. The Rebel's pontoon bridge is near Manchester. They are planning to cross the Cumberland River near Lebanon and assault Nashville from the north or break into Kentucky.
Dec 4 - The Rebel army retreats to the east towards Woodbury. Union cavalry continue scouting near Columbia, Chapel Hill and 4,000 dismounted cavalrymen are in LaVergne.
Dec 5 - The Union army "liberates" 1,000 horses from the local population to use for Wilson's cavalry.
Dec 8-11 - An ice storm slows halts most movement in middle Tennessee. The Rebels are running extremely low on supplies (food, ammo, blankets, etc). Lee's men begin taking supplies and rations from locals. Some desertions begin in the CSA army.
Dec 12 - Once the weather clears Lee and Stewart corps march from Woodbury to Smithville.
Dec 14 - The Battle of Woodbury - Stewart's dug in corp repulses attacks from Smith and Wood. The Federals retreat to Murfreesboro.
Dec 19 - Forrest's cavalry captures the Armstrong Ferry on the Cumberland River. They plan a naval "Trojan horse" surprise attack on Nashville on the Cumberland River lead by Forrest and a select group of men. A local merchant, with the help of Rebel engineers and forged documents has turned his steamer into a cotton clad towing a barge filled with men and guns, disguised as a hospital barge.
Dec 20 - The Rebel army advances towards Nashville from Lebanon. Stewart begins to move south west to flank the Union position (Smith's corp) in Murfreesboro. The Union line now runs North to South-east from Nashville to Murfreesboro.
Dec 21 - The Battle of Nashville - The Rebel corps of Cheatham, Lee and Forrest assault Nashville defended by Wood, Schofield and Steedman. Stewart (CSA) and Smith (USA) are shadowing each other south near Murfreesboro.
And so here we are! The Battle of Nashville was played out by The Norsemen. With 2/3 of each army present for battle this will be the climatic and likely final battle of the campaign! Can Hood's gallant army drive away the Federal army and capture Nashville? Or will they be defeated on the Mill's Creek line, shattering their hopes and dreams?
Battle of Nashville December 21st, 1864 – After Action Report from Brett.
The Players: 1st night
Union: Brett (Gen Steedman, Gen Thomas & Gen Schofield), Sam (Gen Cruft & Gen Wood)
Confederates: Peter (Gen Hood, Gen Forrest & Gen Cheatham), Steve (Gen Lee)
The Players: 2nd night
Union: Brett (Gen Steedman), Neil (Gen Thomas & Gen Schofield), Marko (Gen Cruft) & Sam (Gen Wood)
Umpire: Brett
It was my intention to just umpire but at the last minute Marko could not make it for the first night and Sam though an experienced Ancients player had never played ACW and therefore never played F & F.
Before we began the battle it was decided to make all Confederate brigades Ex and to make their degradation by 2 for each level for units of 6 or more to reflect the fact that this was a do or die attack by them. For example, the 1st Brigade under General Johnson’s Division was made Ex 7 / 5 / 3 instead of the original Ex 7 / 6 / 4. In addition we decided to make the Confederate break point as being 40% of their total infantry & cavalry bases (excluding artillery bases) whereas with the Union we made it 30% by command (including infantry and dismounted cavalry bases but excluding artillery bases). Once a Union command hit the 30% casualty mark it had to retire towards its base edge at least 2” every turn. I could still shoot and fight hand to hand but could not make any move towards the enemy.
It therefore became a classic game of Quality Vs Quantity.
 |
| Union line along Mill Creek. Schofield and Wood. |
The Union army was set up as per Cory’s instructions before the Confederates arrived. The Confederates then set up. Their plan was to throw everything against Gen Wood in the hope that a quick 30% would take his corps out of the game before Gen Schofield could redeploy South.
By attacking Gen Wood so far south the 4 heavy guns and Steedman’s 3 batteries were rendered useless as they were out of range.
The Confederates moved quickly around the hill with their infantry whilst occupying the hill with as many guns as could fit on it. The rest of the Confederate artillery formed up north of Gen Lee’s infantry coming around the hill from the north and south of Gen Cheatham’s infantry coming around the south of the hill. Gen Forrest headed south and dismounted so he could cross Mill Creek and come through the woods upon the Union flank. Most of the Union artillery was set up intermingled with infantry defending the length of the river and being so deployed many did not have an angle with which they could target any Confederates.
Other than destroying a limbered Confederate battery the artillery honours went to the Confederacy. In their opening fire they silenced 2 Union batteries and damaged another. They did this by throwing 2 consecutive “10”s with all their artillery that was unlimbered. The problem that this created was that they had to limber and move back in their next movement.
 |
| The Rebel army advances! |
It probably happened 1 move too early as Gen Lee was not yet ready to cross. Gen Cheatham saw his opportunity and took it. 3 of his brigades charged across Mill Creek and slammed into the 2nd Brigade of Kimball’s Division who had the 2 silenced batteries and then the 2nd brigade was disordered from firing. The Union only managed to disorder 1 of the 3 attacking Confederate brigades.
Up until now the Union players had thrown abysmal dice. We come to the hand to hand. The factors are +5 to the Confederates and -4 to the Union. The Confederates throw 2 and the Union throws 10. The final result Confederates 7 Union 6 a difference of 1. The Union brigade falls back 3” the batteries pull back and the Confederates advance 1”.
More than any other event in the game that was the moment for the Union. Had the Confederates won and won well the 3 breakthrough charges would have been 2 charges into the flanks of other Union brigades and straight ahead into either limbered artillery or a Union brigade in unsupported line.
That single combat saved Gen Wood’s command from hitting the magic 30% casualty mark. By the games end Gen Wood had lost 19 bases. At 21 he would have retreated. That finished the first night at the end of the 3.30-4.00pm turn.
Second Night.
At the start of the Confederate 4.00pm turn they threw a D6 to determine the outcome of Forrest’s sneak attack upon Nashville. Gen Forrest threw “3” which was – Failure – The boat is captured by a Union gunboat, "The Indiana"
The second night saw the Union under Gen Schofield cross Mill Creek and advance on the Confederates. This meant that about 7 of the Confederate batteries and a few infantry brigades were forced to move North to counter this threat and so were not available to reinforce the attack on Gen Wood.
 |
| The Rebel assault across Mill Creek. |
Gen Cruft after seeing the Confederate opening moves had started to redeploy South and was instrumental in stopping dead the furthest penetration by the Confederates.
Gen Cheatham after failing the first night to shatter Kimball’s Division then attacked again the second night against Beatty’s Division who lost 11 bases of infantry and had 2 batteries captured. But the Confederates were running out of steam. As Gen Wood pulled back in the centre he was able to bring more reserves into the firing line and with Gen Cruft’s firepower with his dismounted cavalry they were taking bases off the Confederates in every phase. They shot very well but then there was a critical hand to hand as Gen Lee threw everything against the left flank of the Union position in the forest and charged into the dismounted Union cavalry. The factors were Union 0 and Confederates 3. The Union threw 9 and the Confederates threw 1. 9 to 4 in favour of the Union. The Confederates were pushed back disordered.

It sounds like the Confederates were extremely unlucky but that is not the case. Here is a list of a majority of the hand to hand combats by result after dice were added in: In every one of the combats the Confederates were the attacker except for the second one.
Union Confederate
5 6
9 4 Union brigade charged the rear of a Confederate brigade
6 14 The next turn another Confederate brigade charged the Union brigade that won the previous combat
13 15
1 12
As it turned out it was really the first combat that deprived the Confederates of a really good shot of getting a tactical victory.
Lessons learned:
- The Confederates basically spent the entire game in field column until their units reached 4 stands and then I ruled that they had to be counted as supported line. This helped the Union shooting as they would get +1 on the die roll for shooting at a column.
- Starting a game setup and having artillery pre-deployed cost the Union a lot of shooting.
- Manning the edge of Mill Creek whilst giving the Union a +1 in hand to hand made it easier for the Confederate artillery to shoot at better factors and allowed the Confederate infantry to assault much earlier.
Result: Game ended at the close of the 5.00-5.30pm turn with a win to the Union forces.
NARRATIVE (by Cory) - After a brave assault by the soldiers in the CSA Army of Tennessee against the Army of the Cumberland, which almost broke Wood's corp and drove them from the field, heavy losses of 40%+ and the onset of of night forced the Army of TN to fall back. Hood ordered a retreat to their base in northern Alabama, covered by Gen. Stewart's intact corp. Gen. Thomas ordered Gen. Smith's corps to pursue but the pursuit was slow and the Union was stopped by a valiant rear guard action at Tulahoma, TN (Battle of Tullahoma). Gen. Thomas and his generals saved Nashville from invasion and the campaign for middle Tennessee ended on Christmas Eve 1864 after a forced march, with the Army of Tennessee safely in Alabama.
Summary of Losses
Union Losses - – 25 bases of infantry, 3 guns captured
Confederate Losses – 31 bases of infantry, 0 bases of cavalry, 3 guns destroyed and 1 gun captured
Losses by Command
Gen Steedman – breakpoint 8 lost 0
Gen Cruft – breakpoint 5 lost 0
Gen Schofield – breakpoint 15 lost 6
Gen Wood – breakpoint 21 lost 19
Confederate – breakpoint 26 lost 30
 |
| Outskirts of Nashville TN defended by Gen Steedman. |